New 6502 Bootloader
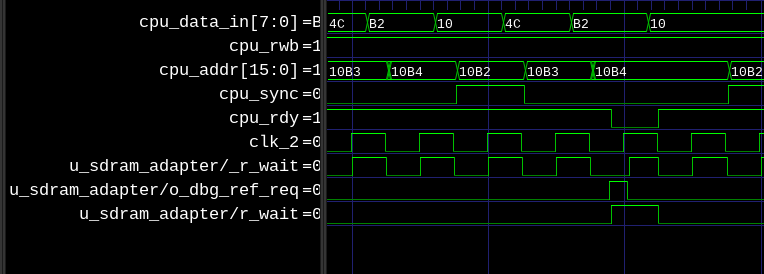
Continuing from my last post about SDRAM, there was one more issue that I did not notice at the time, which is auto refresh. The 6502 bus normally only gives one cycle for any access, but it is not always possible for devices to have such a quick turnaround. Specifically, the SDRAM may go into a refresh cycle and not respond in time

There is a signal coming from the SDRAM controller which indicates when an auto-refresh is occuring. When this happens, we assert RDY, which pauses the CPU until the refresh is over, at which point we let the CPU keep going. Without this, the CPU would read garbage from RAM whenever a refresh happened.
The next big thing that I did was change from using the SD protocol for the SD card to using SPI. The spec for the SD protocol is not really available for free, and I was having trouble getting it to work properly. SPI is very easy though, and once I switched over to it, I had very few problems with the SD card. I found a tutorial here which was very useful. I first copied it almost directly and tried it out on the Sapphire SOC, which is the RISCV CPU for Efinix FPGAs. That worked well, so then I ported it over to the 6502. Originally I copied it over in C, but later rewrote it in assembly to make it much faster and smaller.
After this, I rethought how I was booting the system. I knew that I wanted to be able to use a normal, modern filesystem and I chose FAT32 with LFN, or VFAT. This means I can plug the SD card into a modern computer and simply drag and drop files over.
The system first boots into the ROM built in to the FPGA. This contains a bunch of the cc65 runtime, and the code to read from the SD card. It then load the boot sector from the SD card and jumps to it.
The bootsector is output as its own file, but is linked along with the ROM so it has access to all exported functions. I was thinking about having the ROM be more like a BIOS, which would have a defined interface that wouldn’t change every time I changed the ROM code. In the end, it was easier just to have them linked together and update the FPGA image every time the ROM changed.
I create the filesystem on my laptop, then use dd to copy over just the parts
of the bootsector that need to change, leaving the BPB which contains all the
information about the drive. Then I can copy over the second stage bootloader
and the kernel as regular files onto the mounted SD card.
The bootsector will look through the root directory of the SD card and find a file called “BOOT2 BIN”, a.k.a. “boot2.bin”. We ignore LFN since its not neccessary for now. After loading it into memory we jump straight into it.
The second stage bootloader will then look through the root folder for a file called “KERNEL O65”. It will then load it into memory and parse it. The reason for the second stage bootloader is that it needs to be able to load multiple sectors into memory and parse the FAT and o65 file, which the first stage bootloader would be to small to do. the o65 format allows for relocation, but we do not relocate the kernel. We still have to parse through all the relocation tables since the file header does not contain offsets into the file for each section, you have to parse through it to figure out when the segents end.
After we parse through the kernel file and copy the text and data segments to the corresponding place in memory, we jump to the kernel.
And thats where I stand right now. I still need to add in the memory mapper, a clock, and the ability to load user programs.
It’s been a while since my last update, but I’ve been a little busy finishing school, going on vacation, and then starting my new job. I do think that I have been making some good progress here, and by the end of the year I’ll have something worth showing.
As always, code is on my gitlab